

SLV CONSOLE (CGI)
Massive thank you to Lukas Guziel once more for composing such a fantastic score. A music piece that elevated the animation to whole new heights! Listen to his Score and his other amazing works on SoundCloud
This project started out with the desire to expand my horizon and learn Blender more in depth. Together with the upcoming 15.000 Subscriber threshold being reached on my YouTube.
I have been using Cinema 4D as my main application for most of my life and only strayed into other 3D packages very briefly. This included Houdini and also Blender in the past. But I had the desire to dig a bit deeper and see if the grass is indeed greener on the other side... Spoiler, its equally as good, but tastes different... So I decided to do one of my animation projects completely in the open source package.
Keep on scrolling if you are curious, there are explainer text bits sprinkled throughout this project page.
Shoutouts:
Lukas Guziel for the fantastic sound design and score.
Cornelius Dämmrich & Ulf Ohnesorge for being good friends and motivating me throughout the project.
Again Maxime Roz for his great HDRIs.
The Blender Community for inspiring and helping.
The whole Project is available on Patreon!
SLV CONSOLE Animation
RENDERING
This project was shaded lit and rendered in Cycles X. I rendered it in a resolution of 2560 x 1440 px
For greater control and finesse in the compositing stage all lights were split up into light groups and then rendered as extra Pass / AOV and saved as 16bit float DWAB compressed EXRs in linear ACEScg color space.
After compositing and postprocessing this was upscaled to UHD 3840 x 2160 px.
Render times were around 2:30 - 4:00 min / frame on a 3 x RTX 3090 + RTX 4090 machine (3300 OB)
The 8K 7680 x 4320 px stills rendered in about 30 minutes.
Cycles handled this kind of animation very well. Time to first pixel is amazingly fast with about 10 seconds and more complicated things as motion blur was handled as expected. This made for a very fluent shading experience that was one of the best ones I had in Years.
SLV CONSOLE STILL (8K)

SLV CONSOLE STILL 2 (8K)

SLV CONSOLE STILL DETAIL

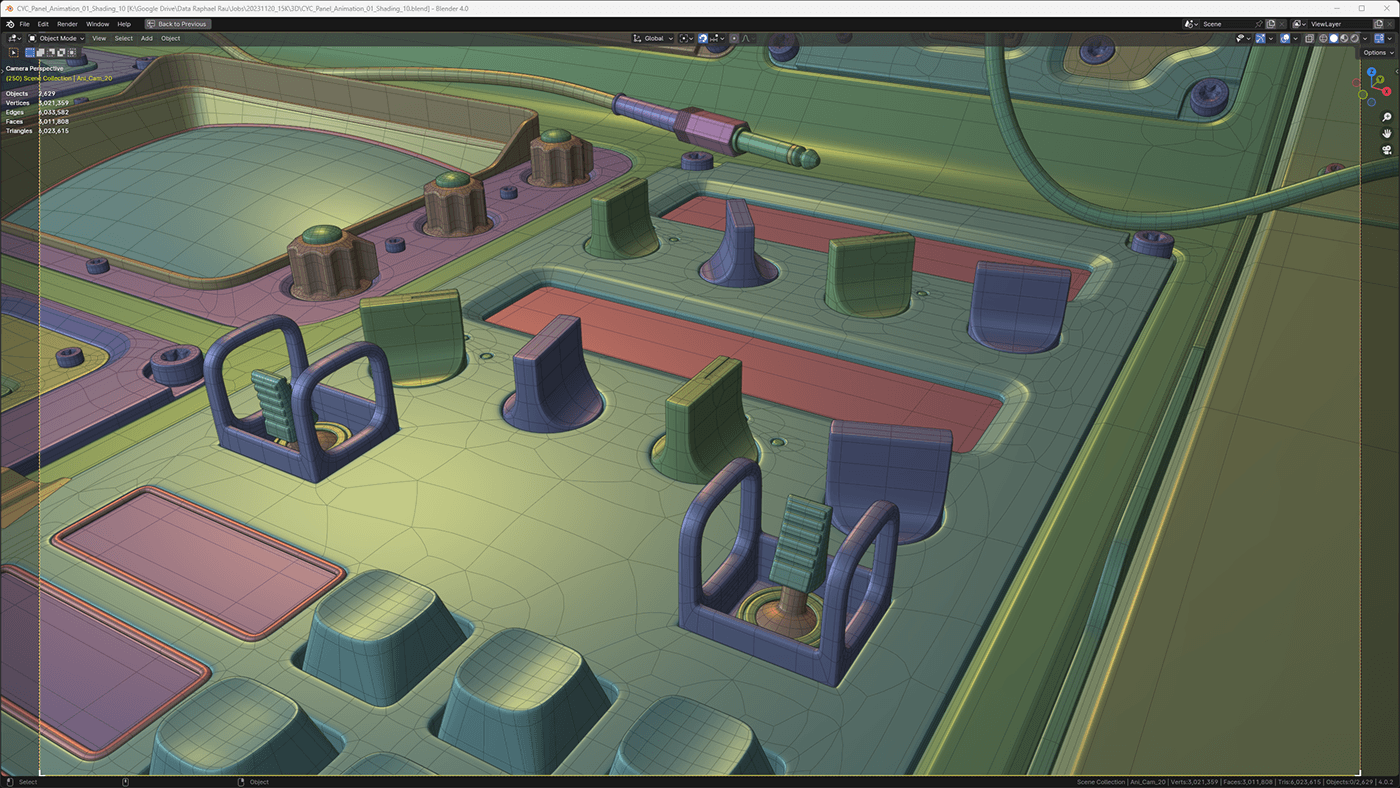
MODELING
As in the past in C4D with my Nostalgy Project (PC) , Loveletter (Gameboy) and SLV Tubes projects before, the attention was on clean Subdivision Surface modeling as well as correct measurements. Since I was learning Blender, this was an amazing training piece getting up to speed with my muscle memory learning all those modeling commands!
If you are interested, I made a YouTube video about Subdivision Surface - modeling a Keyboard Keycap in Blender HERE
BREAKDOWNS
As in the pa If you are familiar with past entries to Behance, you know I always do some breakdowns. And this project is no different. In the following I show the wires, the light passes as well as the comp process of 4 selected shots.
As in the pa If you are familiar with past entries to Behance, you know I always do some breakdowns. And this project is no different. In the following I show the wires, the light passes as well as the comp process of 4 selected shots.
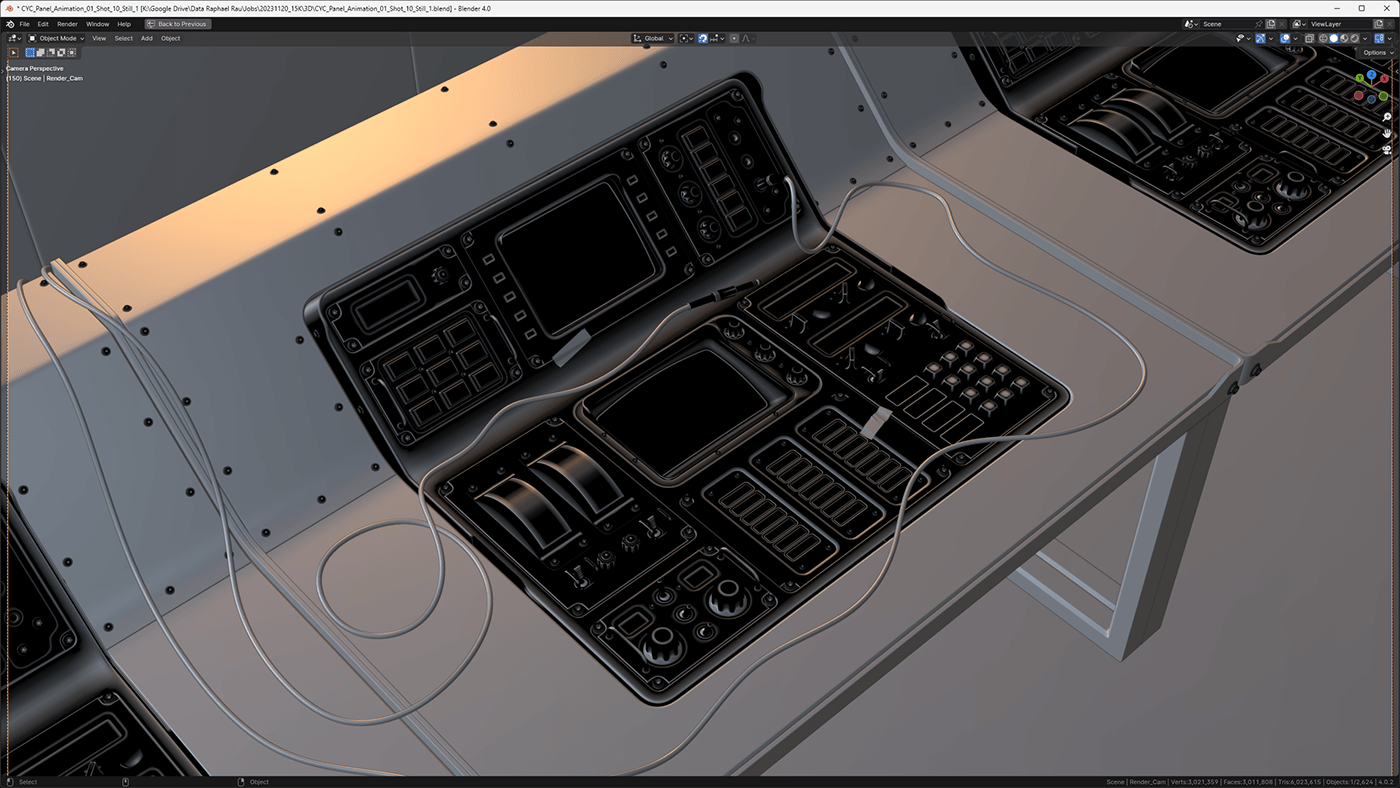
SLV CONSOLE SHOT 1 WIRE

BREAKDOWN SHOT 1 LIGHT GROUPS

BREAKDOWN SHOT 1

SLV CONSOLE SHOT 3 WIRE

BREAKDOWN SHOT 3 LIGHT GROUPS

BREAKDOWN SHOT 3

SLV CONSOLE SHOT 5 WIRE
BREAKDOWN SHOT 5 LIGHT GROUPS

BREAKDOWN SHOT 5

SLV CONSOLE SHOT 8 WIRE

BREAKDOWN SHOT 8 LIGHT GROUPS
BREAKDOWN SHOT 8

GEOMETRY NODES
As I usually used C4Ds Xpresso to rig my cables, I needed to find a substitute. Luckily Blender comes with Geometry nodes, an easy to use node based framework to create and modify meshes in a procedural way. Basically the Houdini side of Blender.
As I usually used C4Ds Xpresso to rig my cables, I needed to find a substitute. Luckily Blender comes with Geometry nodes, an easy to use node based framework to create and modify meshes in a procedural way. Basically the Houdini side of Blender.

Also I built myself a "Sweep Nurbs" with UVs to create the cable.
Fortunately the Blender community is so active that I could find tutorials and forum posts about all of that without any problems.
Fortunately the Blender community is so active that I could find tutorials and forum posts about all of that without any problems.

CONCEPT
Lets go back to the beginning. When I started out, I knew that the console might be a bit more complex. So I started sketching out different layouts. In the sketch below you can see that I tried to find a design language as well as different knob ideas that came to mind.

Once I was happy with them I did some prep work in Illustrator. Laying out all the panels and instruments so I do know the exact measurements as well as their location. In Blender I brought in those layouts as image plane to have a good foundation to work with.
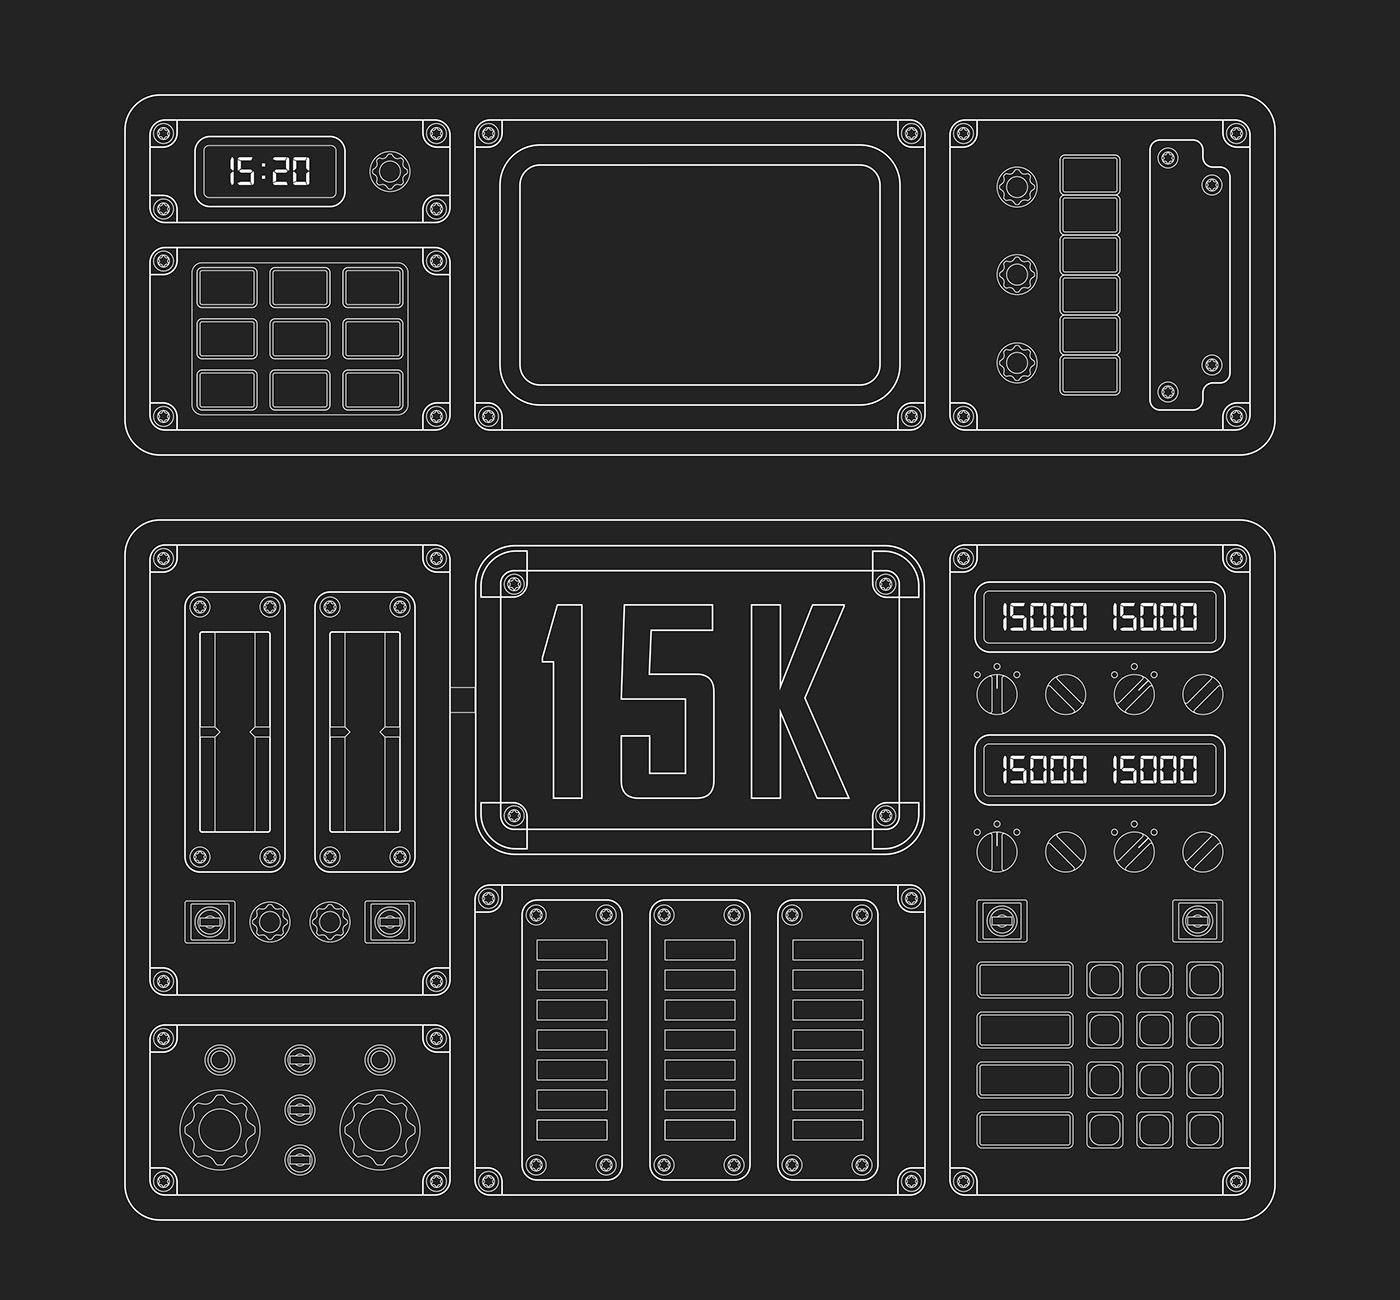
In the beginning I planned to have the center panel, that is now a screen, to be a large 15K button. I later felt this idea was to gimmicky and opted for a 2nd CRT screen instead. I am glad I ended up with the decision. Maybe I can use the 15K model in another project though.
SHADING
I first started shading this project in Blender Octane. But hit some walls in terms of scene preparation time. So I switched gears to Cycles and actually was surprised how easy, effortless and fast I was able to work.
While I still love Octane very much, I have to say that this was one of the most frictionless and enjoyable shading experiences I had in Years!
Also things like Blended Cube Mapping / Triplanar Mapping as well as random offsets for all the repeating objects, to have variation in texturing from one to the other, was a breeze and really easy to implement!
I used convex and concave Vertex Paint / Vertex Weights and attribute nodes to bring in those weights in my materials to expose the used parts, where the metal is showing through and the more hidden parts where dust has settled in.
MATERIALS

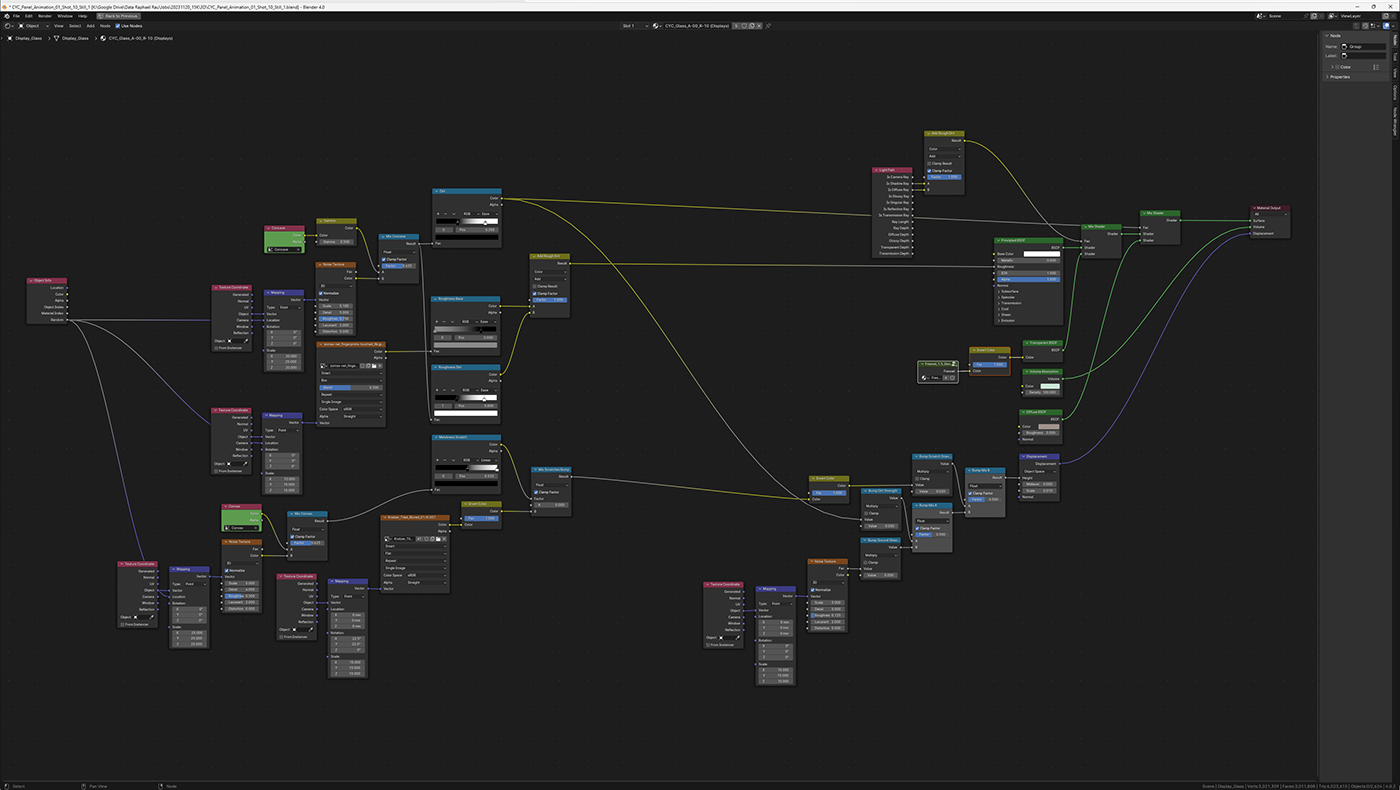
CONSOLE GLASS MATERIAL
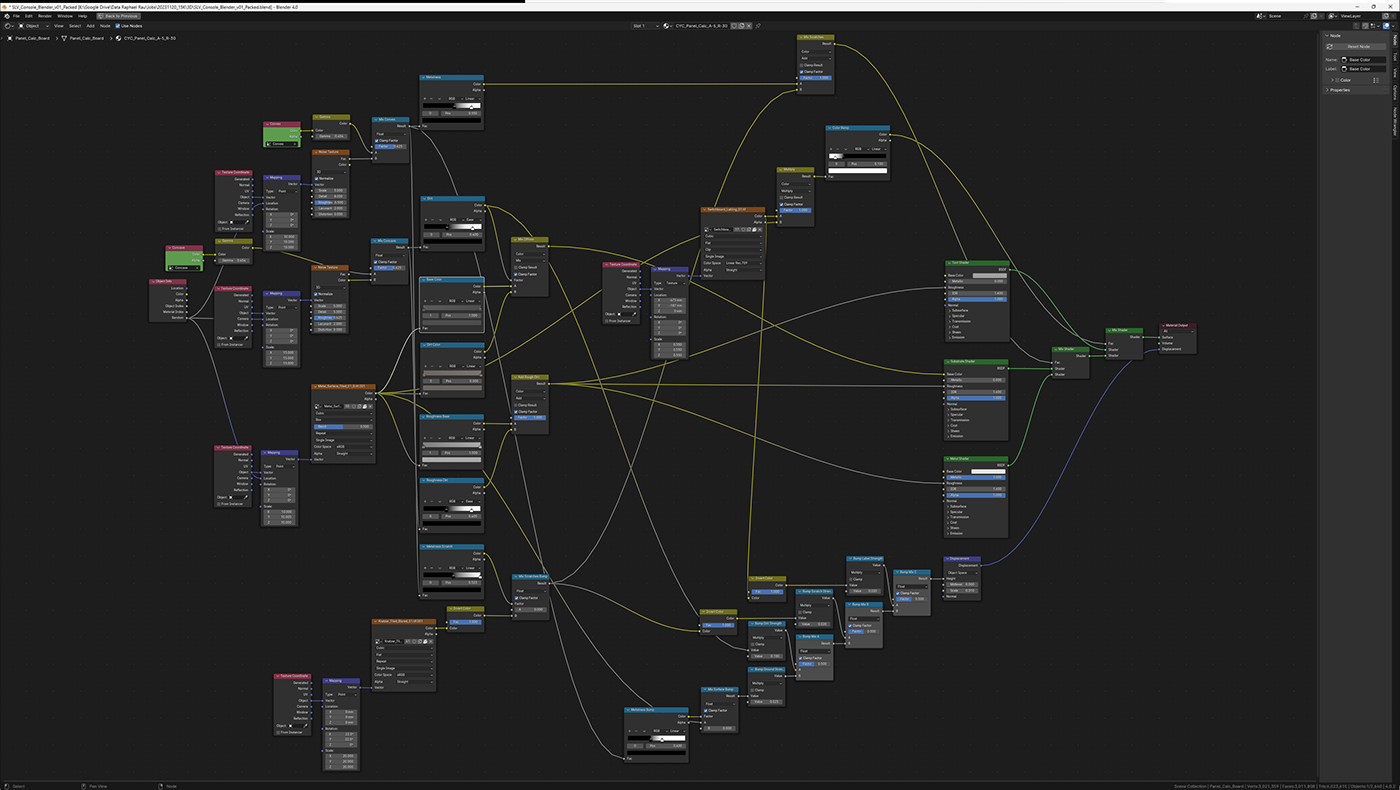
CONSOLE TOP MATERIAL NODES
For most of my materials I implemented layers, so metal can peek through on portions where the paint is chipped away. I used the Vertex Paint (green Attribute nodes), as demonstrated above, to drive the chipped / used edges of the shaders as well as some dust in the creases.
For most of my materials I implemented layers, so metal can peek through on portions where the paint is chipped away. I used the Vertex Paint (green Attribute nodes), as demonstrated above, to drive the chipped / used edges of the shaders as well as some dust in the creases.
In the example above, there is an additional element in there to create the white text on the surface of the panels. The image below shows the "silk-screen" for the whole console:

PLASTIC MATERIAL
If you have no substrate in the materials (such as metal) the material structure gets more simple. As with this dirty plastic for the knobs.
If you have no substrate in the materials (such as metal) the material structure gets more simple. As with this dirty plastic for the knobs.

SCREEN ANIMATIONS
As I built screens within the Console, I needed to play something on them. So I did some "motion graphics" for the screens. While the top one is mostly static and waiting for inputs (though the side selector buttons) the lower one shows the 15k approaching.
As I built screens within the Console, I needed to play something on them. So I did some "motion graphics" for the screens. While the top one is mostly static and waiting for inputs (though the side selector buttons) the lower one shows the 15k approaching.
I animated some distortions and flickering in comp but added the actual shadow mask in the shader in cycles.
This was done by multiplying a repeating image of the RGB pixel elements of a TV over the animation.
This was done by multiplying a repeating image of the RGB pixel elements of a TV over the animation.

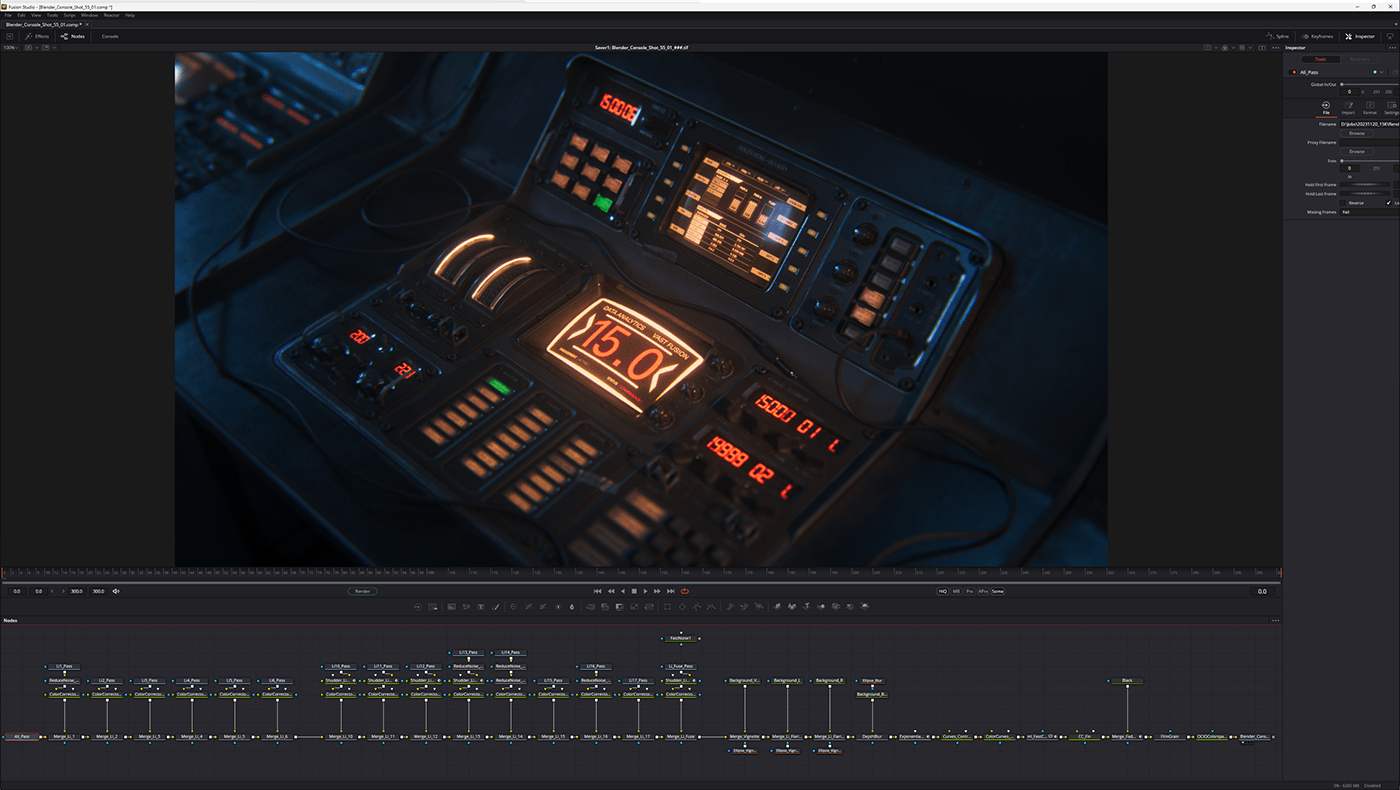
COMPOSITING
If you are now wondering what produced those nice comp results. The answer is Fusion Studio. Formerly owned by Eyeon, now BlackMagic, it´s a great tool to take in single passes of the render and tweak them to "perfection". I usually do this with 16bit float DWAB compressed EXRs in an linear ACEScg color space.
If you are interested I have a tutorial how to handle ACES in Fusion using one of the shots from another project Fusion Tutorial.
In the next image you can see how a usual node-tree of this project looked like
Most of the nodes you see is bringing in the Light Groups and adjusting them in intensity and then adding them to the rest of the "flow".
MODULE TURNTABLES
In this section I split out all the different modules of the console, encased them into aluminum and made a turntable of it. Enjoy!
In this section I split out all the different modules of the console, encased them into aluminum and made a turntable of it. Enjoy!
CALC MUDULE
CTRL MODULE (FUSE MODULE)
PWR MODULE (REGULATOR MODULE)
SENSOR MODULE
BUTTON MODULE (SWITCHBOARD)
SELECTOR SCREEN MODULE
AUDIO PROCESSING MODULE
MAIN DISPLAY MODULE
WHOLE CONSOLE
If you made it here I have to thank you very much for your attention and endurance!
I hope you were entertained and had a good read. If you find any errors or like to reach out for further questions. absolutely feel free to do so!
PATREON THANKS
I want to take the time to thank my Patreons who give their hard earned money to support me making tutorials but also artworks like this.
I hope you were entertained and had a good read. If you find any errors or like to reach out for further questions. absolutely feel free to do so!
PATREON THANKS
I want to take the time to thank my Patreons who give their hard earned money to support me making tutorials but also artworks like this.
50 Euro
Gilles Augustijnen, Leonstudio TV
15 Euro
ABstudio, Alessio De Vecchi, Alex Wilson, Bhavana, BVR, Chris Fritsche, Christian Grajewski, Computer Generated, Erbe + Acaremy, George Luna, Harish Pawaskar, Joey Ciccoline, Just Ah Freakin,
Kris Clemson, Lootger, Nico Straub, Part1of2, Quốc Anh Đặng, Rayko, Renato Marques, Reshock, Shamus Johnson, Terry Wayne Ranson, Yassin Rupp, 士博 郑
Also a huge thank you to my 5 Euro and 1 Euro subscribers!
THANK YOU VERY MUCH FOR WATCHING!
As a bonus, here´s a an unused shot from the production:
For more work visit SILVERWING-VFX
For tutorials about C4D, Octane and Blender visit my YOUTUBE
For tutorials about C4D, Octane and Blender visit my YOUTUBE


